2013 Travel Map Up & Running
Since we’re already {{gasp}} one month and 12 blog posts into 2013 I figured it was high time to launch our 2013 travel map. As usual I’m using Google maps where each and every stop is marked, including our travel route plus a link to every blog post done in that spot. The map is always active in our “Journey” section which (quite handily) is the same place we keep records of our past 3 years of travel. So, should you find yourself wistful and longing of our whereabouts, that’s where you can go 🙂

POST UPDATE -> How to Create Your Own Google Map
Several of you expressed interest in how I actually create these Google Maps so I’m adding a quick tutorial for everyone:
1. Create a Google Account – You need to have a Google Account in order to be able to save and update maps. You can do this either by signing up to a free gmail account, or Google+ or just sign-up directly here: https://accounts.google.com/NewAccount
2. Log-Into Google – Once you have your account just log into Goggle on their main page


3. Go To Maps Section, then “My Places” – Once you’ve logged into Google click on “Maps” and then click on “My Places“. This is where you’ll create and store all your personal maps.
4. Create Your Map! Click on the “Create Map” button to get your map started. At this point I suggest you take the interactive tutorial provided by Google. They do a much better job than I can of taking you through the steps (as well as all the customization you can do). You should see a link to “interactive tutorial” right underneath the “My Places” button on the left-hand side of the page
5. SAVE Your Map – Once you’ve added/changed whatever you want to your map, make sure to save it. Next time you want to update your map simply log-into Google, click on “My Places” and you should see it right there.


This is great, now we can find the spots you already visited and enjoy what we have learned about them form your blog….
Excellent. So happy it’s helpful!
Nina
This is EXACTLY what I want to do Nina, as we discussed on the FB group we are both on. What I haven’t figured out is how to go back to the map I saved and add to it and save the whole map again, so I can then go back and add again. Every time I get directions or save the map it only shows what I saved the first time around.
If you wouldn’t mind, I would LOVE to have step-by-step instructions on how to add to a map already created. If you’d rather you are welcome to email or PM me. Thanks again for your commitment of sharing your time & effort with us.
I have been a fan of your blog since you and Paul were wintering at Markham Park in Ft. Lauderdale one Christmas 🙂 My! How time flies when you are having fun 🙂
Can’t believe you’ve been following the blog since Markham Park. That’s just wonderful!!
Just added an update to the main post with step-by-step instructions on how to do the map. The most important thing is to start by creating a google account so you can log into google. That will give you the flexibility to manipulate and save maps in “My Places”. Let me know if you run into any problems.
Nina
Thanks Nina! I do use Google for everything …just couldnt get the map to save new pins….will go study when I get back to my PC.
Looks like Im not the only one who needs special training 🙂 Thanks for sharing so generously 🙂
I use your Journey section all the time. It’s great! I wish I could figure out how to do the same thing on my blog. I’m struggling with the whole thing. I can’t even post my pictures any more! (enough about me) … Thanks for YOUR fantastic blog! –Linda
So happy to hear the section is helpful! Hope my little tutorial helps out.
Nina
Love it. we have ours pre-plotted with places we would like to see, and willing to run off course at any point and time.. woo HOO (great idea though, linking posts to places on google maps) gonna STEAL it! woop woop
Feel free to steal!! I think this is a great way to share your travels!
Nina
No no don’t answer RVingFT’s comment privately. I have the same question. Seems I can’t figure out how to update my map without having to start all over. I know it is probably going to be painfully simple and I’ll feel like an idiot but I’m ok with that. :-))
And yet another call for a tutorial blog post about your map technique, please.
Your wish is my command! Just added the tutorial. Hope it helps!
Nina
THANKS for the tutorial!
Ditto to the question asked by RVingFT, Sherry and John Shroeder. I have been driving myself crazy trying to figure this out.
Tutorial just added. Hope it helps!
Nina
Great way to keep everybody posted as to where you’re heading. Now, it seems you’re going to have to pass on some of your knowledge to others. You are so good at doing that, too. Keep heading North and you will soon be back in Oregon (yeah!!)
Give us a couple of months and we’ll be RIGHT THERE! 🙂
Nina
Hi all, I think all you need is to have a Google+ account. Then you can create, save, and edit maps without having to redo the entire thing.
Once logged into Google, go to My Places then Create a Map. From there you can add points and lines (careful to use a line that follows the road, there is an option for that). Then Save the map. You can share it as normal, and return to it for further additions/editing by going to My Places again. Hope that helps.
Here is my 2013 map:
http://www.van-tramp.com/wp/my-travels-during-2013/
Errr…we don’t Google+ so I don’t think it’s a requirement, but I DO think you need to have some sort of google-related acct so you can log in and out. We just have a regular gmail account and that works fine. That allows me to log into Google and change/save my maps.
I’ll write up a full step by step tomorrow.
Nina
Great idea. I’ve tried doing maps before without much success. Will try this with Google. And definitely link points to posts.
Excellent. Hope my little tutorial helps. As far as linking blog posts once I’ve added a placemark on the map, I simply click on that placemark and put in a link to my blog post right here. To get the link into the placemark box just make sure you’re using “rich text”, not “plain text” (you’ll see an option to change to rich text right inside the placemark box)
Nina
Thanks. What’s “rich text”?
It’s just a type of text that allows you to include links. Plain text doesn’t allow that (it’s just plain text, nothing else). When you add a new placemark onto your map there will be the option to switch to “Rich Text” within the placemark box. It will look like this: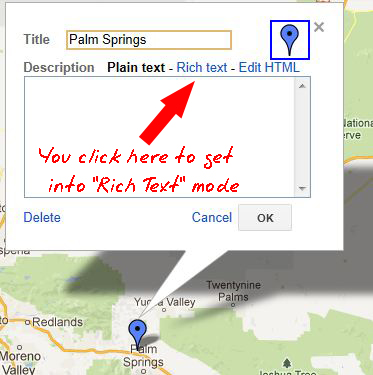 Rich Text option on the placemarks[/caption]
[caption id="attachment_12881" align="aligncenter" width="300"]
Then just paste in the URL?
I went and looked last night and started a map for this trip so I did see that.
Thanks for your help.
Yup, once you’re in “rich text” mode you should just be able to post a link directly into the box (the same way you’d do it in an e-mail for example). You can write anything you want inside that placemark box.
Nina
Hi Nina,
I love how you join your blog posts to your map pin points. Last year we used photos in our google map: http://goo.gl/maps/KCd2r
But this year I’m gonna have to copy you: http://goo.gl/maps/GT3hT
I think it’s really more useful. Thanks for the inspiration!
Oh excellent. LOVE the photos in each spot -> I know other commenters are looking to do that exact thing so thanks for the links! As for adding blog post links to each placemark, see my comment to geogypsy above. You just need to make sure you’re using “rich text” mode. Then you can add-in links directly to the placemark box with no issues.
Nina
I have used google maps to track all our travels and link to my posts. Their tutorials are pretty good and it’s not hard once you get the hang of it.
Yup, the google tutorials are great.
Nina
I was wondering how you created these Google maps. Tx.
Ok, I’m stealing this too. I tried to figure this out a month ago and couldn’t – so happy to stumble upon this. I’m new to blogging and there are some things about WordPress that really give me fits!